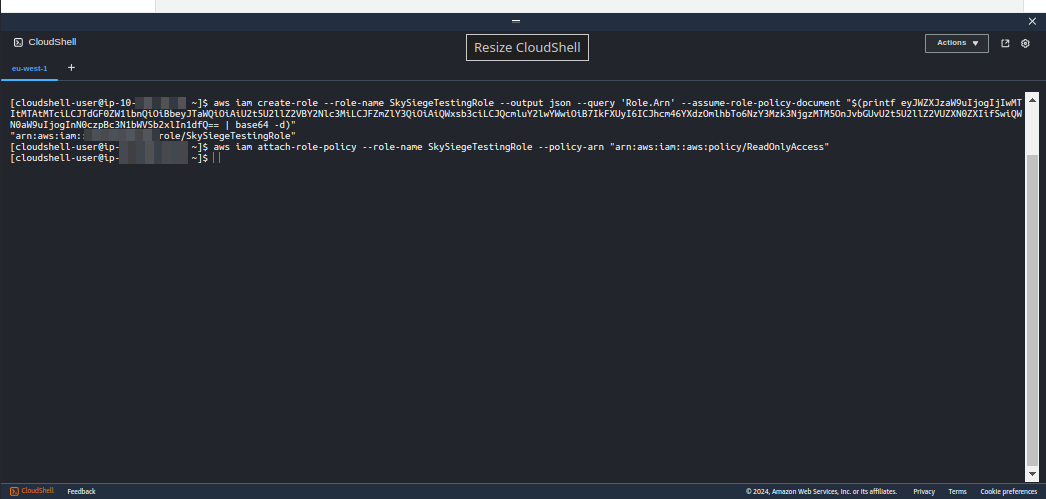
arn:aws:iam:123456789012:role/SkySiegeTestingRoleaws iam create-role --role-name SkySiegeTestingRole --output json --query 'Role.Arn' --assume-role-policy-document "$(printf eyJWZXJzaW9uIjogIjIwMTItMTAtMTciLCJTdGF0ZW1lbnQiOiBbeyJTaWQiOiAiU2t5U2llZ2VBY2Nlc3MiLCJFZmZlY3QiOiAiQWxsb3ciLCJQcmluY2lwYWwiOiB7IkFXUyI6ICJhcm46YXdzOmlhbTo6NzY3Mzk3NjgzMTM5OnJvbGUvU2t5U2llZ2VUZXN0ZXIifSwiQWN0aW9uIjogInN0czpBc3N1bWVSb2xlIn1dfQ== | base64 -d)"
aws iam attach-role-policy --role-name SkySiegeTestingRole --policy-arn "arn:aws:iam::aws:policy/ReadOnlyAccess"
SkySiege provides Automated Vulnerability Scanning for AWS, scanning your cloud infrastructure for vulnerabilities and offering explanations and resolutions. Instead of attempting to break into your infrastructure, which can be disruptive and time-consuming, SkySiege’s Vulnerability Scans query your cloud resources via your cloud provider’s APIs. This approach is faster, safer, and provides less ambiguous results.
To perform the scans, you need to grant SkySiege access to your cloud account so our tools can read your infrastructure configuration. SkySiege only requires read access to the resources you want to be scanned. A simple read-only policy is sufficient.
To provide this access, you need to configure an AWS IAM role in the account you want scanned. This role should have read-only permissions and a trust policy that allows the SkySiege software to read your account resources configuration using this role.
Below are some example configurations and instructions on how to set this up. This role needs to be in place before we can begin scanning. Once access is confirmed, we will perform the scan on the same day. After the scan is completed, you can delete the role and remove access.
Yes, you can control which resources SkySiege can access by adjusting permissions on the role you’ve created. Our software will respect these settings and gracefully handle errors if it cannot scan certain resources.
To enforce these requirements, you can either create a specific set of permissions for only the infrastructure you want scanned or provide a full read-only policy and then explicitly deny access to the resources you do not wish to have scanned.
There’s a number of tools and methods for setting up the role including the AWS Console, AWS CLI and independent tools such as Ansible and Terraform. Please see the below examples to set up.
Once you’ve set up access please let us know the ARN of the role that you’ve created so that we can begin scanning.
You must confirm the ARN of the role that you’ve set up so that we can test and confirm access!
The common element throughout all these methods is to provide a role in your AWS Account that has the following trust policy:
{
    "Version": "2012-10-17",
    "Statement": [
        {
            "Sid": "SkySiegeAccess",
            "Effect": "Allow",
            "Principal": {
                "AWS": "arn:aws:iam::767397683139:role/SkySiegeTester"
            },
            "Action": "sts:AssumeRole"
        }
    ]
}
This allows only the SkySiege testing identity to access your account for scanning.
We advise that you add the AWS Managed Read Only policy to the AWS Role that you’ve created. The unique policy ID for this role is:
arn:aws:iam::aws:policy/ReadOnlyAccess
You can add any Permission policy you like to the role depending on what access level you intend SkySiege to have.
Creation of the role in the AWS Console is straight forward. Log into your account and navigate to the AWS IAM Service. You can do this by:
IAM in the search bar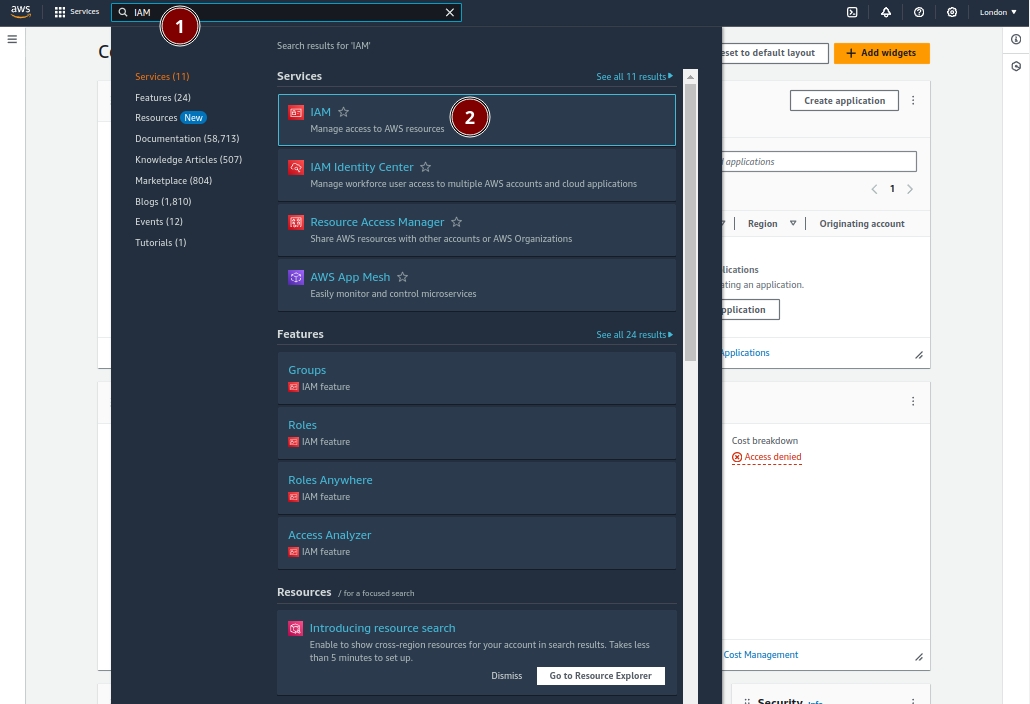
In the IAM Service console you can create a new AWS IAM Role by:
Roles in the side menuCreate role button in the top right of the consoleYou’ll now be able to create a new role via the instructions. This first page will set the Trust Policy, ie, who or what can become this role. To allow SkySiege to become this role:
Custom trust policy as your Trust entity type{
"Version": "2012-10-17",
"Statement": [
{
"Sid": "SkySiegeAccess",
"Effect": "Allow",
"Principal": {
"AWS": "arn:aws:iam::767397683139:role/SkySiegeTester"
},
"Action": "sts:AssumeRole"
}
]
}
Next button in the bottom right of the console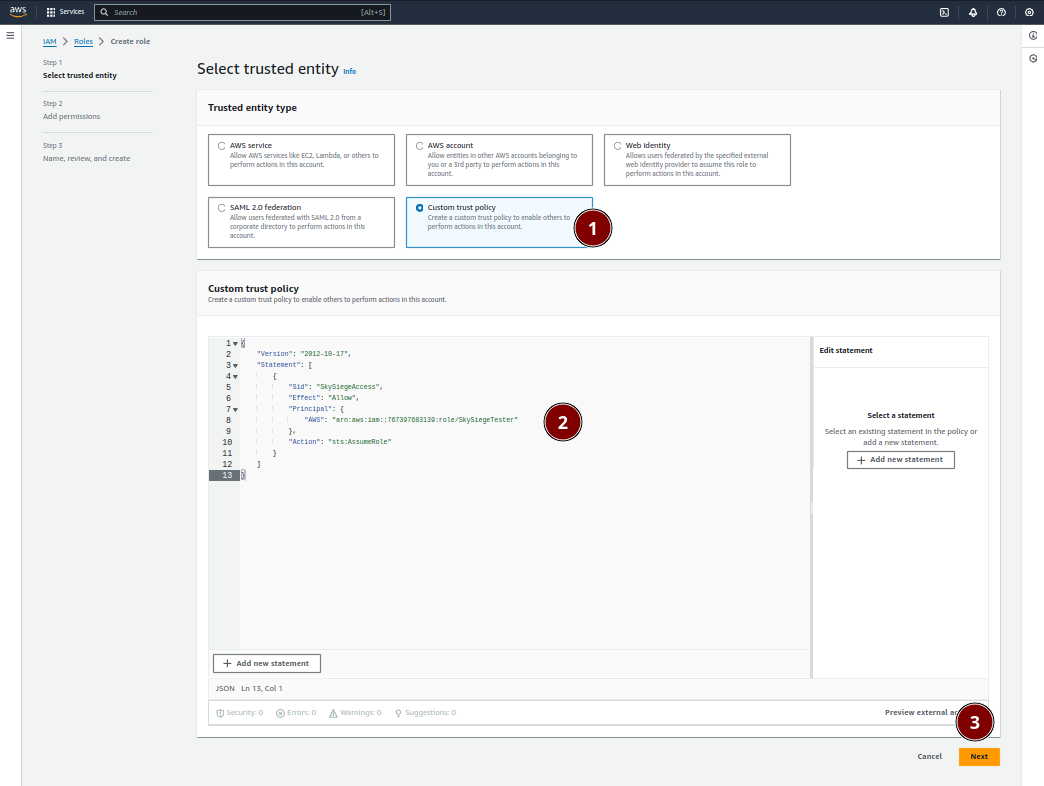
On the next page you’ll be able to set the permissions for your new role. Generally we advise allow for the ReadOnlyAccess permissions policy which is maintained by AWS. This will allow SkySiege to scan your whole account whilst preventing any changes and not providing access to sensitive data such as AWS Secrets.
To apply the ReadOnlyAccess policy:
ReadOnlyAccess in the results. We usually find it on the last page of the results which you can skip to using the results paginationReadOnlyAccess policy by clicking on the checkboxNext button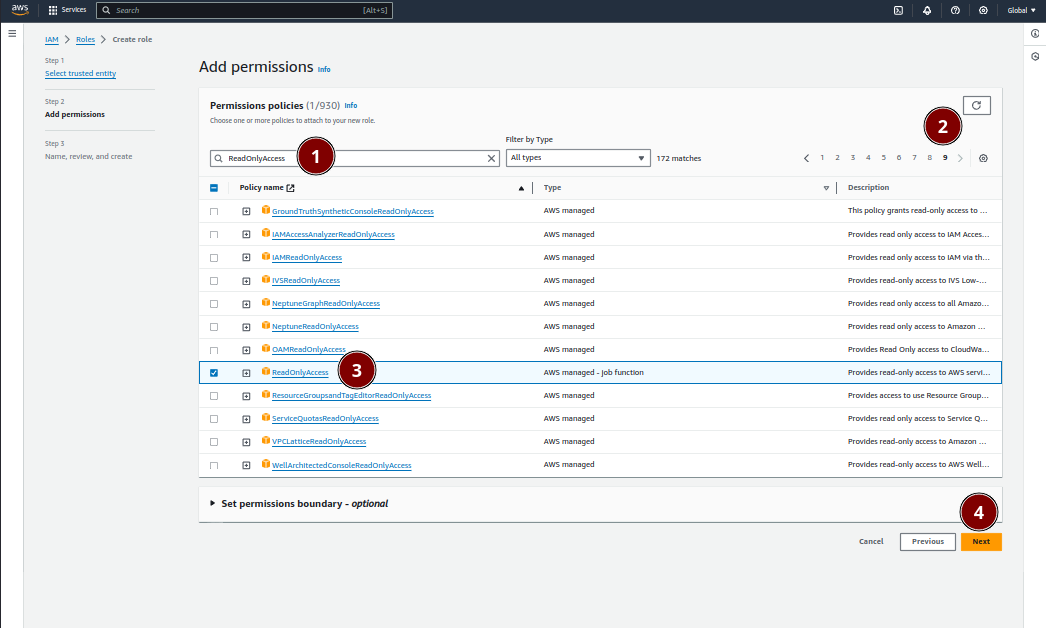
The final step is to give your new role a name and description and to confirm it’s creation:
SkySiegeTestingRole in our exampleThis role is created to allow SkySiege Vulnerability Scanning software to access this AWS account.
Create role button in the bottom right to confirm creation of the role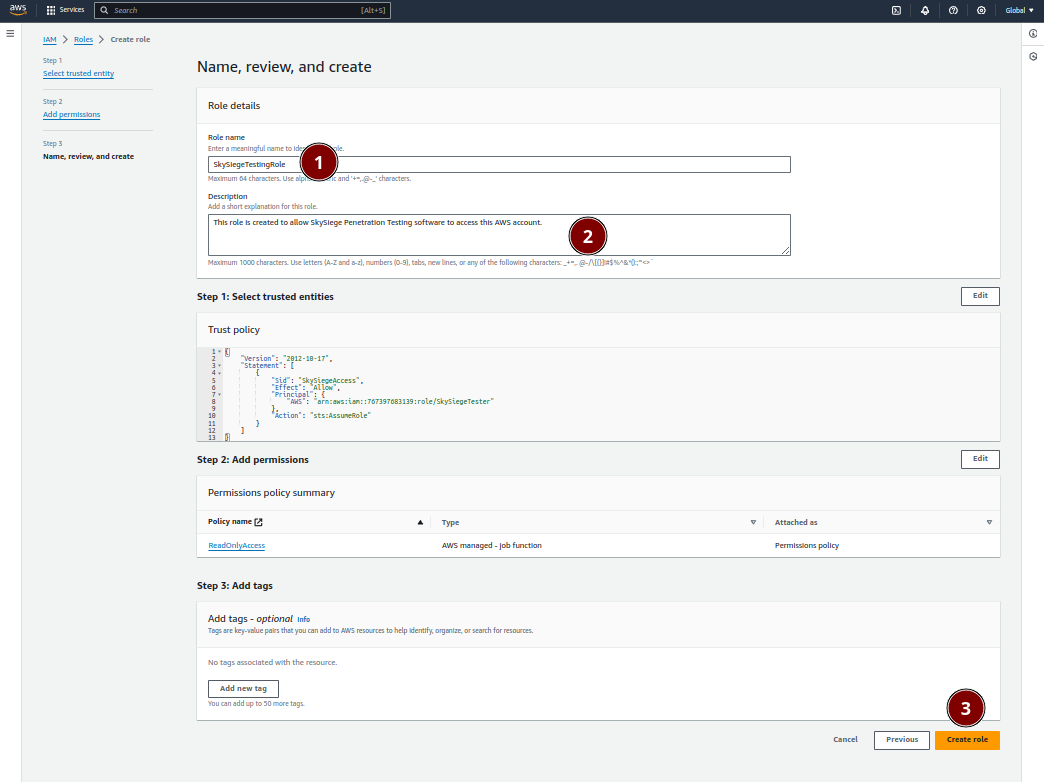
Your role will be created and you’ll be returned to the AWS IAM Role screen. Up the top of the screen your new role will be confirmed, it will also be in your results list.
You’ll need to confirm your new role’s unique ID with SkySiege so we know how to access your account. This unique ID is known as an Amazon Resource Name or an ARN.
View Role button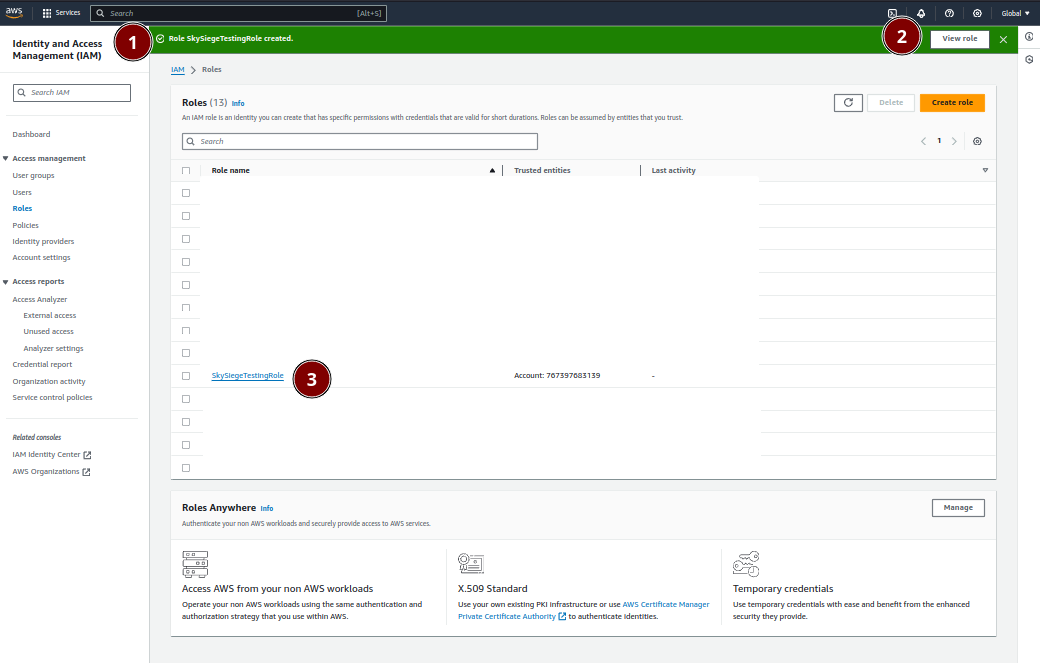
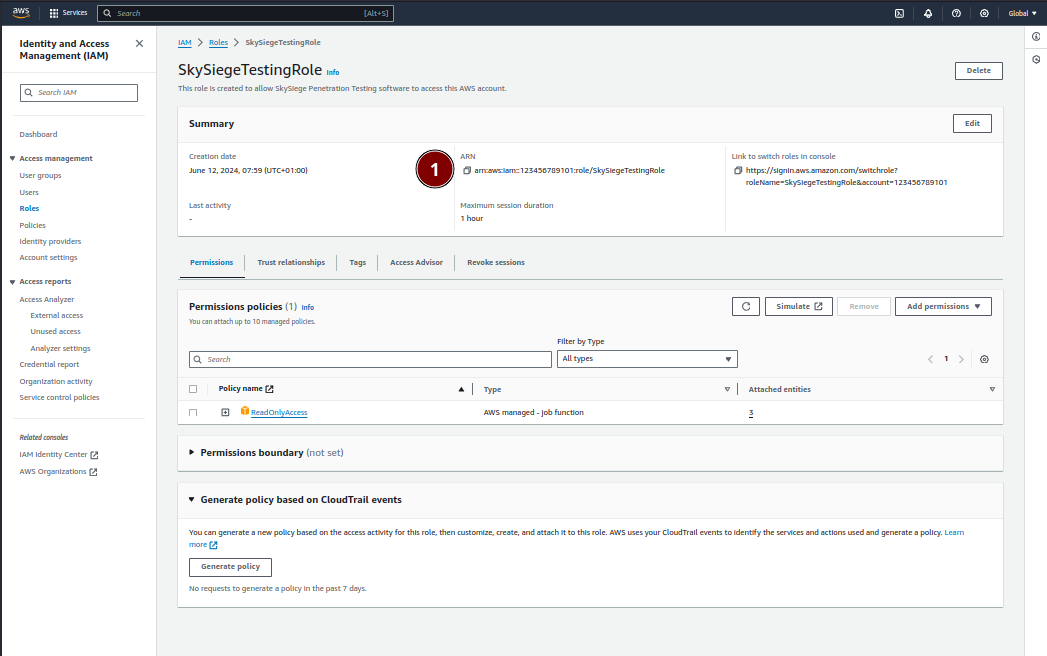
On the page of your new role you’ll find the ARN for the role in the Summary section. Simply send us this value and we’ll be able to scan your account
The ARN should have the same format as the ARN we created in our example:
arn:aws:iam::2132456789101:role/SkySiegeTestingRole
Setting up access via the AWS CLI can be done with two commands and a text file.
./skysiege-trust-policy.json and paste in the following:{
"Version": "2012-10-17",
"Statement": [
{
"Sid": "SkySiegeAccess",
"Effect": "Allow",
"Principal": {
"AWS": "arn:aws:iam::767397683139:role/SkySiegeTester"
},
"Action": "sts:AssumeRole"
}
]
}
aws iam create-role --role-name SkySiegeTestingRole --assume-role-policy-document file://skysiege-trust-policy.json
ReadOnlyAccess role managed by AWS which will allow for a full scan without allowing any access to secrets or the ability to make changes.aws iam attach-role-policy --role-name SkySiegeTestingRole --policy-arn "arn:aws:iam::aws:policy/ReadOnlyAccess"
Cloudformation is AWS’ IaC offering allowing resources to be managed as code. It’s built into every AWS Account and can be an easy and accessible route for managing your cloud resources.
To deploy a SkySiege role you can use the following whole stack to manage the role as a separate deployment.
AWSTemplateFormatVersion: 2010-09-09

Resources:
  SkySiegeRole:
    Type: AWS::IAM::Role
    Properties:
      RoleName: "SkySiegeTestingRole"
      ManagedPolicyArns:
      - "arn:aws:iam::aws:policy/ReadOnlyAccess"
      AssumeRolePolicyDocument:
        Version: '2012-10-17'
        Statement:
        - Effect: Allow
          Principal:
            AWS:
            - "arn:aws:iam::767397683139:role/SkySiegeTester"
          Action:
          - sts:AssumeRole
Once created you’ll be able to get the ARN for the new role by:
Resources tabSummary section in the new pageIf you intend to utilise Terraform for setting up the role you can do so with the following resources which will set up an AWS IAM Role under the name SkySiegeTestingRole with the appropriate trust policy and the AWS Managed ReadOnlyAccess permission policy. We’ll leave it to you to handle the backend configuration and deployment management!
data "aws_iam_policy_document" "assume_role_policy" {
  version = "2012-10-17"
  statement {
    effect = "Allow"
    actions = ["sts:AssumeRole"]
    principals {
      type        = "AWS"
      identifiers = ["arn:aws:iam::767397683139:role/SkySiegeTester"]
    }
  }
}

resource "aws_iam_role" "skysiege" {
  name               = "SkySiegeTestingRole"
  managed_policy_arns = ["arn:aws:iam::aws:policy/ReadOnlyAccess"]
  assume_role_policy = data.aws_iam_policy_document.assume_role_policy.json
}
Please provide the ARN of the created role after deployment. You can do this using the steps above to get this from the console or by setting the role as an output:
output "skysiege_arn" {
  value = aws_iam_role.skysiege.arn
}
Ansible is our preferred orchestration software at SkySiege. You can use Ansible to deploy out a new role by saving the below YAML as a file and deploying with the command ansible-playbook <file.yml>. The playbook will print the ARN of the new role which you can send to us!
- name: Deploying a role for SkySiege
  hosts: localhost
  tasks:
  - name: Adding IAM Role
    register: new_role
    community.aws.iam_role:
      name: "SkySiegeTestingRole"
      assume_role_policy_document: |
        {
          "Version": "2012-10-17",
          "Statement": [
            {
              "Effect": "Allow",
              "Principal": {
                "AWS": "arn:aws:iam::767397683139:role/SkySiegeTester"
              },
              "Action": "sts:AssumeRole"
            }
          ]
        }
      managed_policies:
      - arn:aws:iam::aws:policy/ReadOnlyAccess

  - name: Printing ARN for the new role
    debug:
      msg: "Your new ARN is: {{ new_role.arn }}"
No worries, book in a call and we’ll guide you through it
Great, we offer one off scans that can be completed the same day. Simply order via our purchase page below.
A security and architecture assessment for a single cloud account with follow up consultation
$3,500 per single Assessment
Get My Assessment